By Keven Pinto.Oct 27, 2022

In Part 1 of this blog we setup the infrastructure and other building blocks of our CICD pipeline — in this part we will show how we promote code within our managed environments via our CICD pipeline.
A managed environment is any Cloud Composer environment managed by a CICD service, Google Cloud Build, in this instance. For the purposes of this worked example, test and prod are our managed environments.
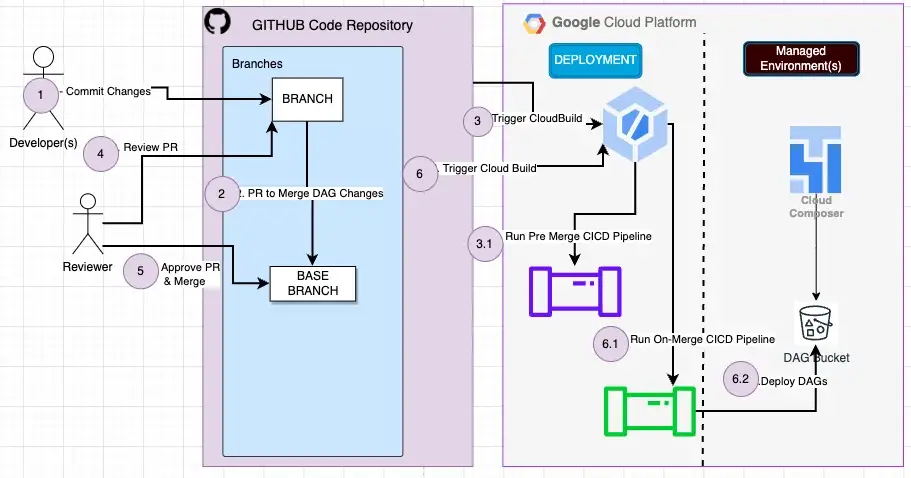
CICD Workflow

Before we start implementation, let’s take a quick look at our CICD workflow:
- Devs have tested the DAG(s) in their own sandboxes and have committed changes to their dev branch
- A PR is raised by our dev to merge code changes to a managed branch i.e. test or main in this example
- The PR triggers a Cloud Build pipeline(/cloudbuild/pre-merge.yaml) — This trigger was setup in Part 1. this pipeline performs linting checks, security checks and DAG tests
- A member of the team reviews the code as well as checks the output of the pre-merge checks from our CICD pipeline
- The Reviewer merges the PR if all checks have passed in the pipeline and the changes are in line with expectations
- The merge triggers our second Cloud Build Pipeline (/cloudbuild/on-merge.yaml), this pipeline deploys our code to a managed environment, the environment the code is deployed depends on our base branch and its associated environment (/config/env_mapper.txt)
Please note that Steps 6.x will only run in case the reviewer Approves and Merges the code to the Base Branch
Push Changes to the test environment
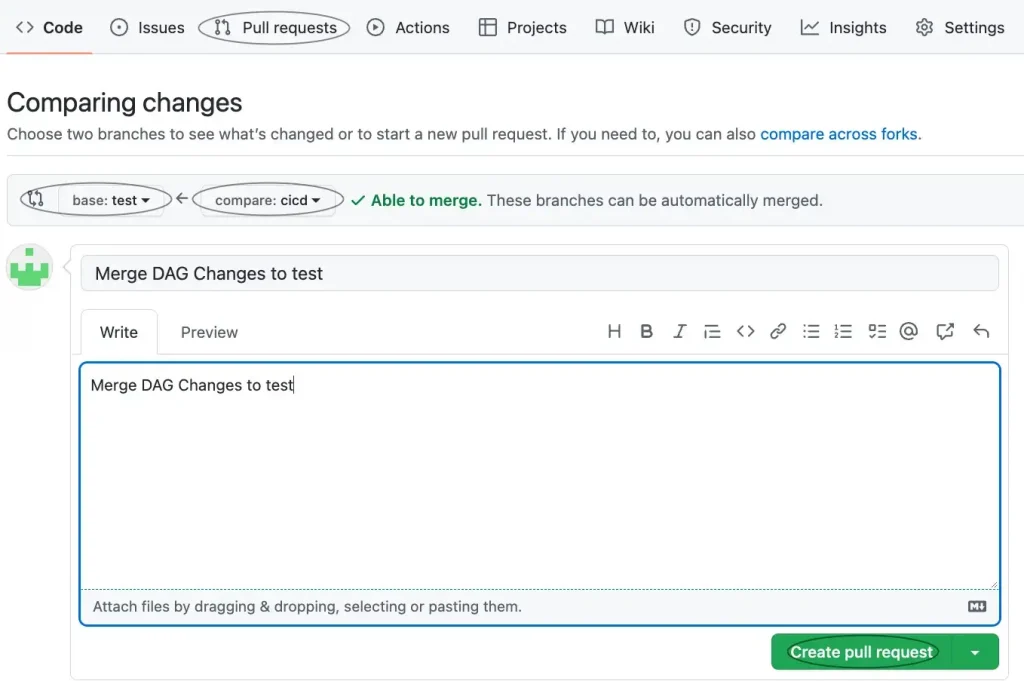
In Part 1, we left off with a successful deployment of our DAG to the dev environment, In this part, we pick up from there and push our changes to the test environment. For this to happen, we first need to raise a PR in GitHub, the PR will involve merging changes from the cicdhead branch to the test base branch.

Once we click the ‘Create pull request’ button, we are presented with a new web page, Our pre-merge pipeline runs at the bottom of this page and looks like the screenshot below.

Clicking on the Details link will present you with a web page showing a summary of the build, Clicking on the Build Reference number should take you to Google Cloud Build Screen in your Google Cloud Console.

As we can see in the Screenshot above, Cloud Build shows us that all our pre-merge checks have been completed successfully.
Our Pre-Merge Tasks performs the following:
- Linting (Flake8)
- Pre Commit Checks (see .pre-commit-config.yaml)
- Dag Integrity Tests — Same as the one we ran for dev in Part 1
- Testing dags using the composer env (?)
What is testing dags using the composer env?
In this step we make use of the /data folder of Composer Dag Bucket to test our DAGs on the actual composer env. This is the best way to dress rehearse our DAG code on an environment it will be eventually deployed to without disrupting the environment.
We first create a sub folder using the commit SHA of the git branch and then copy our dags to this Sub-Folder. As a final step we run the list dags command. If the DAGs are error free one should see an output in Cloud Build similar to the Screen shot below. Kindly refer to this article from Google for more info on this subject.

The steps for our pre-merge pipeline are stored in the file /cloudbuild/pre-merge.yaml. I’d encourage you’ll to go through this code.
Merge the PR

On clicking our ‘Squash and Merge’ or any of the Merge Options our merge pipeline(cloudbuild/on-merge.yaml) will get triggered.

This pipeline will copy our DAGs to the test environment. You should now be able to see your DAGs in test composer environment

Pushing Changes to the prod environment

For pushing your changes to the prod env raise a PR in GitHub once again. this time keep the test branch as the head branch and the main branch as the base branch. I leave this final deployment cycle for the reader to try out for themself.
Deployments to Prod
This tutorial has shown how one can seamlessly deploy to prod, however, we would like to discourage an automatic deployment to prod. The only Cloud Build automation in prod we’d suggest is the pre-merge pipeline. If there is however a business need to automate deployment of DAGs to prod via Cloud Build, i’d suggest adding an approval stage to your CICD trigger. See this article for more info on setting up the same.
Clean Up
Please run make cleanup , this will clean up the 4 projects that were created as part of this tutorial.
Thanks for persevering with this long blog and following along!
References
Makefile Help

About CTS
CTS is the largest dedicated Google Cloud practice in Europe and one of the world’s leading Google Cloud experts, winning 2020 Google Partner of the Year Awards for both Workspace and GCP.
We offer a unique full stack Google Cloud solution for businesses, encompassing cloud migration and infrastructure modernisation. Our data practice focuses on analysis and visualisation, providing industry specific solutions for; Retail, Financial Services, Media and Entertainment.
We’re building talented teams ready to change the world using Google technologies. So if you’re passionate, curious and keen to get stuck in — take a look at our Careers Page and join us for the ride!
Disclaimer: This is to inform readers that the views, thoughts, and opinions expressed in the text belong solely to the author.
The original article published on Medium.
