By Keven Pinto.Apr 12, 2022

In my previous post, I demonstrated how one can get a Dataproc Serverless pipeline up and running from the CLI. In this post, we’ll look at how Dataproc Serverless integrates seamlessly with Cloud Composer and how one can combine the two to create a simple event-driven pipeline.
For those new to GCP, Cloud Composer is Googles managed version of Apache Airflow, In the rest of this article the terms Cloud Composer and Airflow will be used interchangeably.
A bit about the Pipeline …
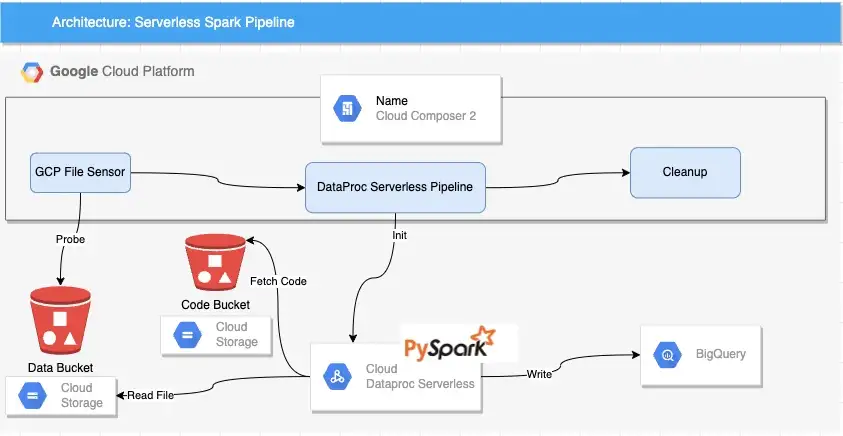
Pipeline makes use of a Google File Sensor to achieve an event-driven pattern. The sensor polls a GCS bucket for files with a certain prefix(stocks*.csv) and triggers a Dataproc Serverless job if it finds any files matching this criteria. Dataproc in turn reads the file(s) and writes the same to BigQuery. If all works, you should see a table called stock_prices in a BigQuery dataset called serverless_spark_airflow_demo in your GCP Project.
Prerequisites
Prior to downloading the Code from Github, ensure that you have the following setup on the machine that you will be executing the code.
- Poetry for dependency management and packaging.
- gcloud installed and authorised to your GCP Project
- gsutil
- bq command line tool
- make build tool
Please also ensure the following in the GCP Project you plan to execute the pyspark job:
- Dataproc API enabled
- Ensure your subnet has Private Google Access enabled
- Ensure Billing is enabled
- Bigquery API is enabled
- Cloud Composer2 (Airflow) installed in your GCP Project
Note: The DAG is written in an Airflow 2.x style and I’m not sure if it will work on any Airflow 1 environments. Let me know in the comments below if it works on Composer 1.x.
Cloud Composer 2 dags folder
Cloud Composer schedules only the DAGs that are located in the /dags folder. This is a subfolder in a GCS bucket that automatically gets created while setting up Cloud Composer. We need the name of this bucket as we need to copy our DAG to this bucket. In order to get the name of this bucket, follow these steps:
- Log into the GCP Console
- Type Environments in the search Box
- This should take you to the following screen

- Click on the DAGs link highlighted above, this will take you to your DAG Bucket, make a note of this bucket as we need this in our next step.
Setting up the Pipeline for your GCP Project
- Download the code from here
- Edit the Makefile in the Repo and update the PROJECT_ID, REGION & DAG_BUCKET variables.
DAG_BUCKET variable is the Cloud Composer bucket that you made a note of in the last step.
# Please add values without quotes
PROJECT_ID ?= <CHANGE ME>
REGION  ?= <CHANGE ME>
DAG_BUCKET ?= <CHANGE ME>
for example:
PROJECT_ID ?= my-gcp-project-292607
REGION ?= europe-west2
DAG_BUCKET ?= europe-west2-composer2-15e6754fg-bucket
- Run the following command from the root folder of the repo to setup the required buckets and dataset in your GCP Project.
make setup
After this command executes, you should have the following assets in your GCP Project:
- GCS Bucket
serverless-spark-airfow-code-repo-<project_number>— our Pyspark Code gets uploaded here - GCS Bucket
serverless-spark-airflow-staging-<project_number>— Used for BQ operations - GCS Bucket
serverless-spark-airflow-data-<project_number— Our source csv file(s) are in here - Bigquery Dataset called
serverless_spark_airflow_demoin BigQuery
Packaging Your Code
- To Package the code and move the binary to GCS execute the following command
make build
Refer to my previous article if you would like to know a bit more on the packaging process
Modify the DAG
Open file event_based_dataproc_serverless_pipeline.py under the /dags folder of the code repo. Change the following 2 lines
PROJECT_NUMBER = <CHANGEME>
REGION =  <CHANGEME>
for example:
PROJECT_NUMBER = '9999999'
REGION = 'europe-west2'
The Project Number can be found in the Home Page of the Console as shown below

Once the changes have been made; run the following command to push your dag to Cloud Composers /dags folder
make dags
Open the Airflow UI

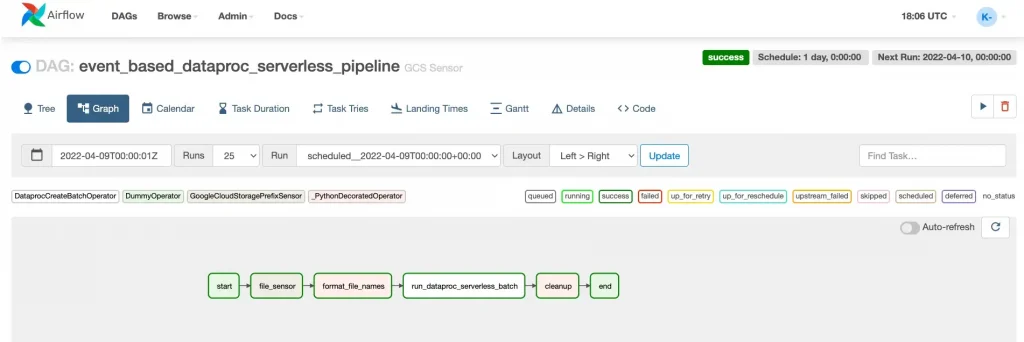
event_based_dataproc_serverless_pipelineYou should now, see the DAG event_based_dataproc_serverless_pipeline as shown above. Click on the DAG to bring up the Screen below

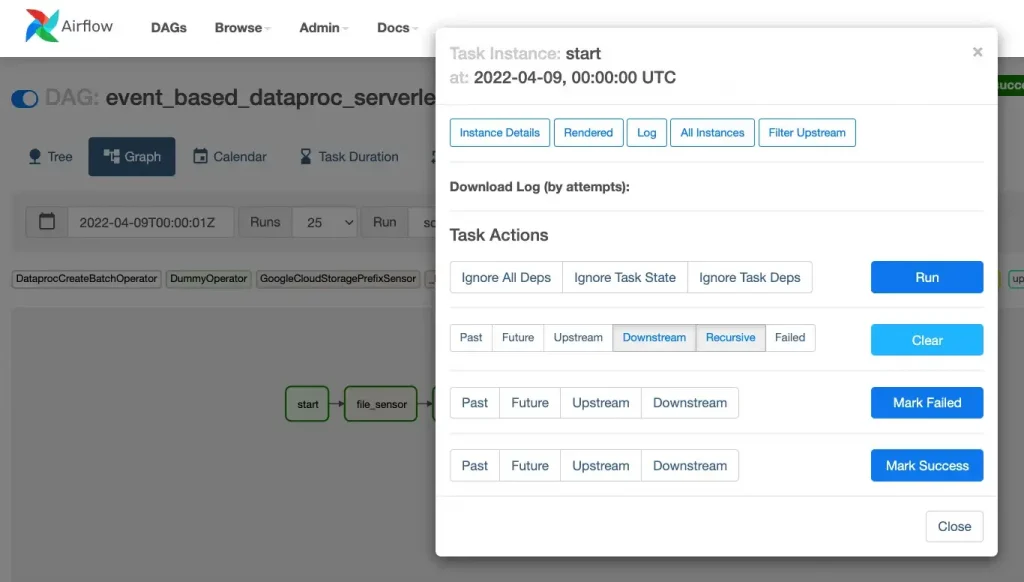
Click on the Task called Start, then click Clear

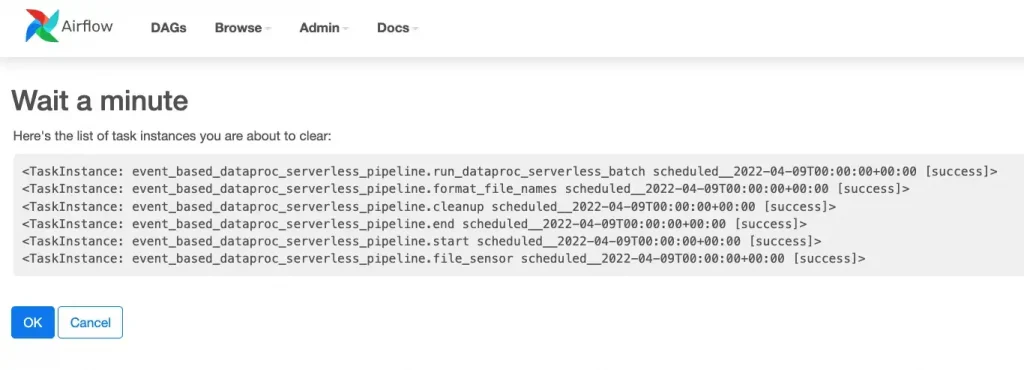
Click Ok on the following screen, this will re-trigger the DAG if this has not already been triggered.

So what’s happening within the DAG?
- The task file_sensor is monitoring the data bucket for files with a Prefix of stocks*.csv. This bucket was created by us as part of the Setup (make setup) . if files are found by the sensor, the task creates an XCOM (Row 1 in image below) returning a list of all the files that match the prefix in the bucket.

Note: We have already pushed 2 files to this bucket as part of setup
- In the next task (format_file_names) we convert the List of files to a single string. This string contains all the file names separated by a comma. See Row 2 in the image above
- Finally, we pass this String of file names to the task run_dataproc_serverless_batch. this task is Initiates a Dataproc Serverless Batch Job in the Background. this can be verified by checking the Batches under Dataproc from the console as shown in the screenshot below.

- If all the tasks in the dag have a Green Border; this means your DAG has been completed and you should see the following table in BigQuery.

- That’s it! We have successfully executed our Pipeline!
Next Steps
I’d encourage you to delete the files from the data bucket, run the dag and once the dag has started, upload files to the data bucket.
Observe the behaviour, see if this triggers the dataproc job !
Note: The file sensor is on a reschedule mode, this means it will reschedule itself if it does not find any files when it first polls the bucket. If files are uploaded after the dag has kicked off, it could be a minute before the dag picks up the files. So, be patient!.
Finally, as the eagle eyed among you may have noticed, the DAG is incomplete from an end to end perspective. Once the files have been processed by Dataproc, they should ideally be moved to an archive location. I’ll leave that bit for you’ll to implement 🙂 Good Luck!
Hint! GCSToGCSOperator.
Links and References
To know a bit more about Dataproc Serverless kindly refer to this excellent article written by my colleague Ash.
I am hopeful you have found this useful and will try this out in your GCP projects. if you like what has been showcased, feel free to get in touch and we shall be happy to help you/your company on your Cloud journey with GCP.
About CTS
CTS is the largest dedicated Google Cloud practice in Europe and one of the world’s leading Google Cloud experts, winning 2020 Google Partner of the Year Awards for both Workspace and GCP.
We offer a unique full stack Google Cloud solution for businesses, encompassing cloud migration and infrastructure modernisation. Our data practice focuses on analysis and visualisation, providing industry specific solutions for; Retail, Financial Services, Media and Entertainment.
We’re building talented teams ready to change the world using Google technologies. So if you’re passionate, curious and keen to get stuck in — take a look at our Careers Page and join us for the ride!
Disclaimer: This is to inform readers that the views, thoughts, and opinions expressed in the text belong solely to the author.
The original article published on Medium.
