By Benjamin R..Feb 16, 2023

Azure, Microsoft’s public cloud computing platform, is used by companies of all sizes to build and release global-scale applications. From start-ups looking to reduce upfront infrastructure cost to enterprises aiming to release products to market faster, Azure offers a wide range of cloud services that help companies meet their business goals. With services for compute, networking, analytics, storage, and more, companies have the ability to deploy distributed, scalable infrastructure. But these services also introduce complexity, as teams need visibility into every layer of their infrastructure to efficiently diagnose performance issues.
Deep visibility into on-prem, hybrid, and multi-cloud environments
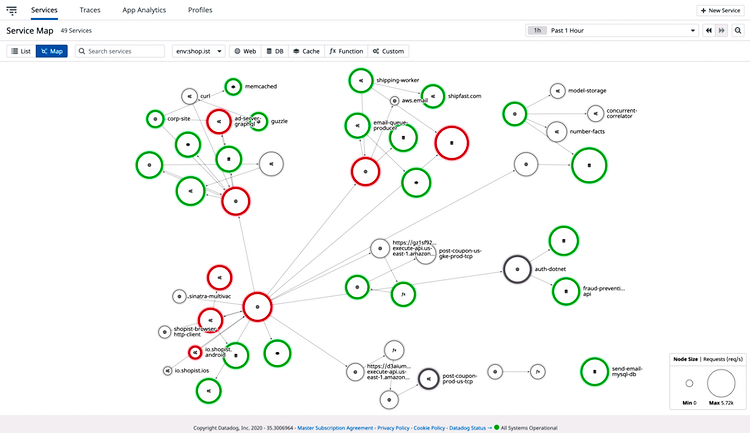
As organizations migrate from on-premise to hybrid or multi-cloud environments, they often rely on multiple monitoring tools for end-to-end visibility. This creates data silos and limits teams in their ability to troubleshoot issues and successfully migrate their workloads. Datadog unifies observability data from any VM and service, providing comprehensive, cross-platform visibility into critical applications. Teams can visualize the dependencies between their on-premise and cloud databases, VMs, containers, and more with Datadog’s Service Map, enabling them to easily track the data flowing across service boundaries.
How I can implementing using Azure?
Using Azure CLI
First, log in to the Azure account you want to integrate with Datadog:
az login
Run the account show command:
az account show
Enter the generated Tenant ID value in the Datadog Azure Integration tile under Tenant name/ID.
Create an application as a service principal using the format:
az ad sp create-for-rbac --role "Monitoring Reader"
--scopes /subscriptions/{subscription_id}
- This command grants the Service Principal the
monitoring readerrole for the subscription you would like to monitor. - The
appIDgenerated from this command must be entered in the Datadog Azure Integration tile under Client ID. - Add
--name <CUSTOM_NAME>to use a hand-picked name, otherwise Azure generates a unique one. The name is not used in the setup process. - Add
--password <CUSTOM_PASSWORD>to use a hand-picked password. Otherwise Azure generates a unique one. This password must be entered in the Datadog Azure Integration tile under Client Secret.
Integrating through the Azure portal
- Create an app registration in your Active Directory and pass the correct credentials to Datadog.
- Give the application read-access to any subscriptions you would like to monitor.
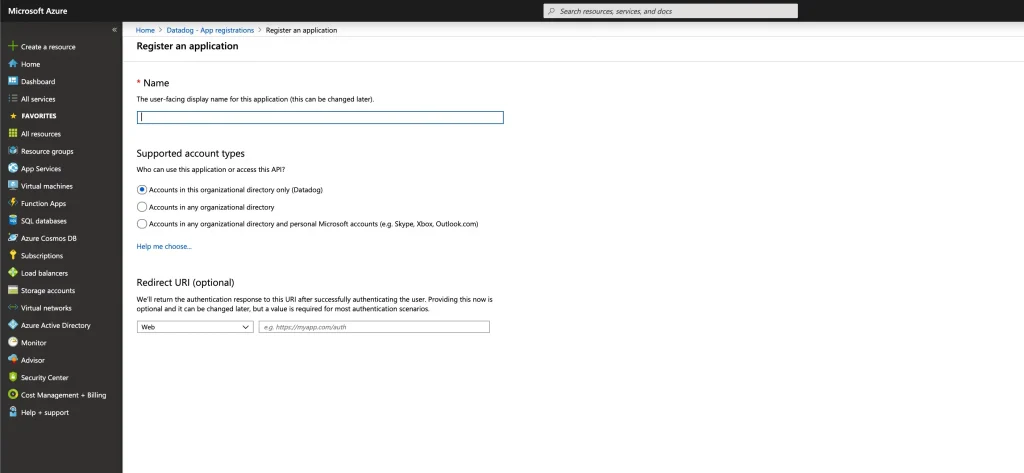
- Under Azure Active Directory, navigate to App Registrations and click New registration.
- Enter the following and click the Create button. The name and sign-on URL are not used but are required for the setup process.
- Name:
Datadog Auth - Supported Account Types:
Accounts in this organizational directory only (Datadog) - Redirect URI:
app.datadoghq.com
Giving read permissions to the application
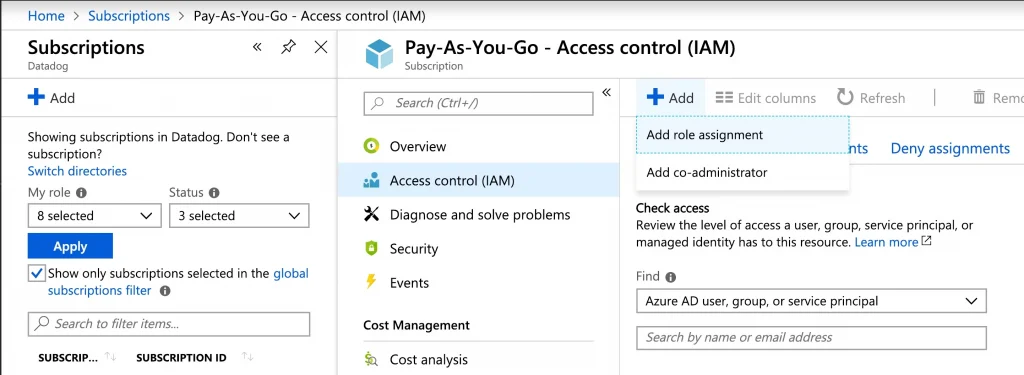
1. Navigate to Subscriptions through the search box or the left sidebar:

2. Click on the subscription you would like to monitor.
3. Select Access control (IAM) in the subscription menu and click Add > Add role assignment:
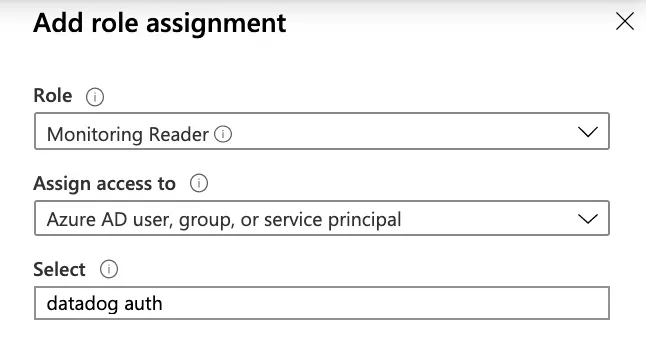
4. For Role, select Monitoring Reader. Under Select, choose the name of the Application you just created:
5. Click Save.
6. Repeat this process for any additional subscriptions you want to monitor with Datadog. Note: Users of Azure Lighthouse can add subscriptions from customer tenants.
Note: Diagnostics must be enabled for ARM deployed VMs to collect metrics, see Enable diagnostics.
- Under App Registrations, select the App you created, copy the Application ID and Tenant ID, and paste the values in the Datadog Azure Integration tile under Client ID and Tenant ID.
- For the same app, go to Manage > Certificates and secrets.
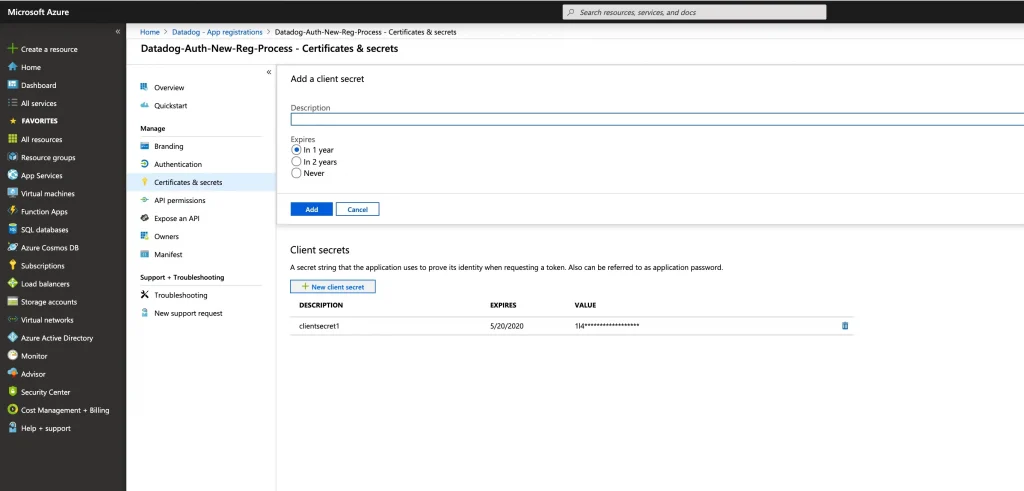
3. Add a new Client Secret called datadogClientSecret, select a timeframe for Expires, and click Add:
4. When the key value is shown, copy and paste the value in the Datadog Azure Integration tile under Client Secret and click Install Integration or Update Configuration.
Agent installation
You can use the Azure extension to install the Datadog Agent on Windows VMs, Linux x64 VMs, and Linux ARM-based VMs.
- In the Azure portal, navigate to your VM > Settings > Extensions > Add and select Datadog Agent.
- Click Create, enter your Datadog API key, and click OK.
To install the Agent based on operating system or CI and CD tool, see the Datadog Agent install instructions.
Note: Domain controllers are not supported when installing the Datadog Agent with the Azure extension.
Validation
It may take few minutes for metrics from applications under the new subscription to appear.
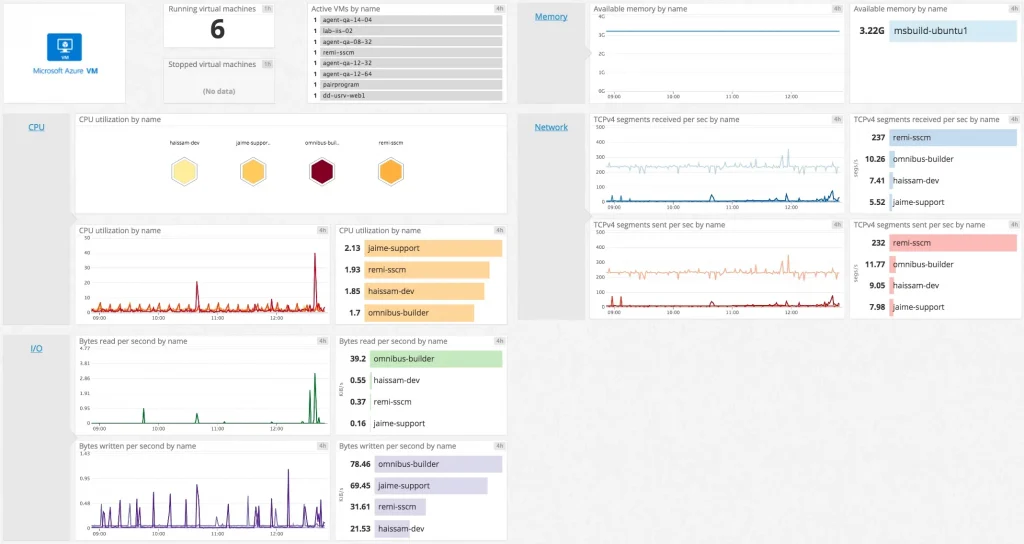
Navigate to the Azure VM Default Dashboard to see this dashboard populate with your infrastructure’s data:
The original article published on Medium.
