By Charles Chen.Sep 25, 2022
Google Firestore is a document-oriented database that has some neat features for building modern apps as part of the Firebase offering.
If you haven’t worked with Google Firebase before, it’s a suite of PaaS tools glued together under one branding and includes:
- An identity management service similar to AWS Cognito or Azure AD B2C
- A document database similar to AWS DocumentDB or Azure CosmosDB
- A real-time sync to the database similar to what’s possible with AWS AppSync and DynamoDB (except without the GraphQL)
- Integration with the Google Cloud Functions runtime
- Integration with Google Cloud Storage
In most respects, I find it is conceptually similar to AWS Amplify on the surface. Having now worked with both, they feel very different in practice.
Supabase is another alternative with a free tier which bills itself as “the open source Firebase alternative” but swaps a NoSQL database for Postgres instead. If you prefer working with relational data, then give it a look. (Note that the realtime broker still isn’t production ready yet).
This diagram showing the parts of the Firebase local emulator provides a high level view of the major architectural components:
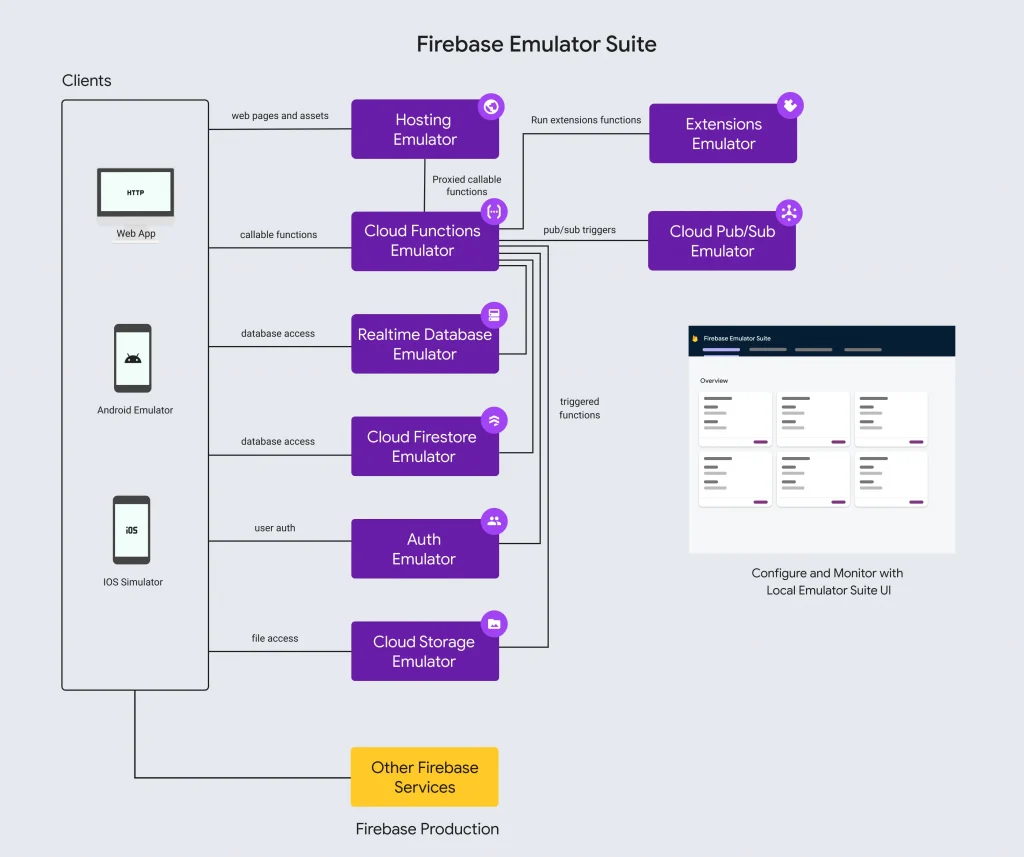
The free tier of Firebase is quite generous, offering a lot headway to build side projects while still being able to scale should you need to. Notably, it doesn’t include compute (Functions), but based on pricing out CloudSQL, compute using either Functions or Cloud Run is probably the smaller part of building a cloud app.
We’ll take a look at how we can build real-time web apps with Google Firebase and dotnet6 with an end-to-end sample with real-time subscriptions, authentication, and back-end API calls — including setup and integration with the local emulator.
If you’d like to jump right to the working code, the full repo is available here.
Prerequisites:
- Set up a Google Cloud account
- Download and install the dotnet SDK for your OS
- Download and install Node and yarn
We’ll also need to download and install the Firebase CLI and Firebase emulator (macOS instructions below; see links above for Windows):
curl -sL https://firebase.tools | bash
firebase --version
firebase login
Workspace Setup
We’ll start by setting up our workspace by creating the directories for our back-end API and front-end application:
mkdir dn6-firebase      # Create our working directory
cd dn6-firebase
mkdir api               # Create a directory for our dotnet6 api
mkdir web-vue           # Create a directory for our Vue front-end.
dotnet new gitignore    # Create a gitignore file at the root
git init                # Initialize git at the root# Initialize a minimal dotnet6 web API in C#
cd api
dotnet new webapi -minimal# Create a new Vue application with TypeScript
cd ../web-vue
yarn create vite . --template vue-ts
With the directory set up, run firebase init from the root of the workspace and follow the prompts:
# ? Which Firebase features do you want to set up for this directory?
Emulators: Set up local emulators for Firebase products
# ? Please select an option
Create a new project
# ? Please specify a unique project id
dn6-firebase-demo
You must create a project; the app initialization will fail later on if you don’t. Don’t worry, you don’t have to provision any services in Google Cloud; you just need to have the project created (I haven’t figure out whether this is hard requirement or not since we’re only using the emulator, but an hour of messing around with this couldn’t solve it!).
Continue with the setup of the emulator and select only Authentication and Firestore for now:
# ? Which Firebase emulators do you want to set up?
Authentication Emulator
Firestore Emulator

# Accept the defaults or enter custom ports and enable the admin UI
# I'm using 8181 for the Firestore port and 10099 for Authentication
# The defaults are 8080 and 9099
# Select a port for the admin UI like 9898
# When prompted, download the emulators
Now we can start the emulator with the following command:
firebase emulators:start
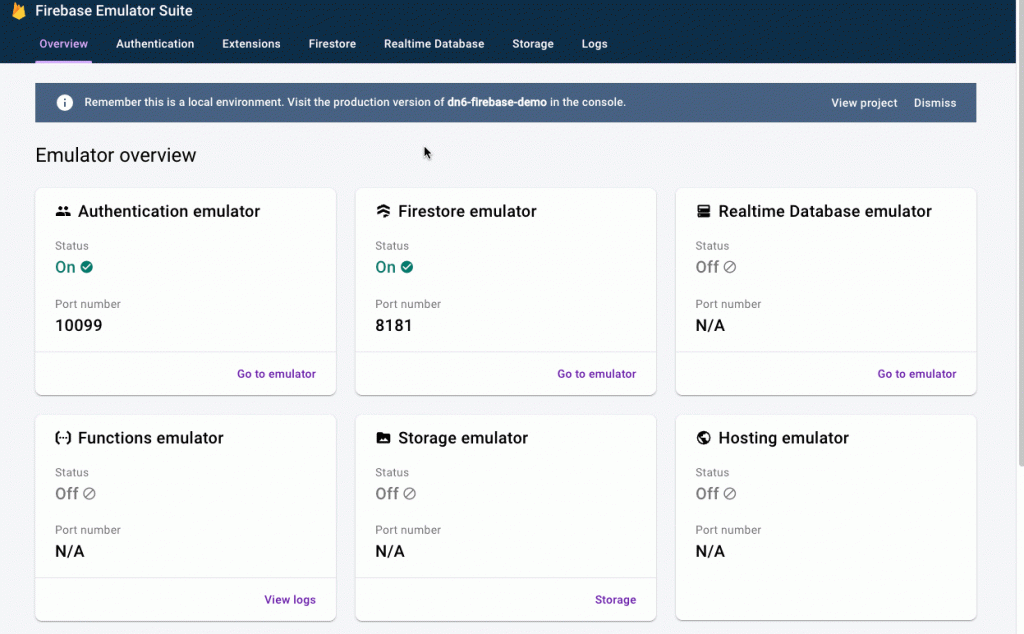
If all goes well, the emulator’s administration UI is available at:
http://localhost:9898
Backend API in C#
Let’s start by building our backend API. Our application will simply capture a list of cities.
Aside: you might be asking why build a back-end with Firebase? After all, you can directly interact with Firestore from the front-end. However, there are several good reasons:
– If you need to or expect to interact with external APIs or utilize Pub/Sub queuing to manage concurrency or use Task Queues to schedule work, you’ll need to have a back-end API.
– If you have complex business logic or rules on your data model that are difficult or impossible to express in the Firestore rules files.
– If your data model has information that you want to control on writes (also possible in the rules file, but easier to manage in code).
Additionally, using the Admin SDKs bypasses the security rules which has benefits as the Firestore security policy file can the focus on read scenarios only. This can be thought of as command query responsibility segregation or CQRS. Having the update logic on a backend API also allows better logging around the mutations without having to introduce a front-end logging library.
This example could certainly be done without without the back-end API, but a part of this exercise is to prove out the auth model of how to interact with a back-end API. But also bear in mind that this breaks offline use cases for Firebase.
First, we’ll need to add the Firestore package:
cd api
dotnet add package Google.Cloud.Firestore
We’ll start by creating a C# record class which represents the city.
Note that the Google Firestore SDK requires us to provide a parameterless constructor 🙁 You can also use a regular class of course.
Now we can add our one and only route using the minimal API style for dotnet 6:
On line 8, we specify that the database connection builder should use the emulator when present.
If you haven’t worked with dotnet before or it has been several years since you last worked with “.NET”, definitely check out dotnet 6. If you want to find out more about dotnet 6 minimal web APIs, head over to the docs.
Now to run this, we need to ensure that we signal to the runtime that we’re using emulation (see line 8 above):
FIRESTORE_EMULATOR_HOST="localhost:8181" dotnet run
On Windows, either set the environment variable or use the launch profile.
With the emulator up and our API running, we can test it now:
curl -v http://localhost:20080/city/add/CA/Los%20Angeles
Front-End in Vue + TypeScript
For the front-end, we’ll build a simple Vue application that we initialized with Vite earlier (a React app is also included in the repo).
Replace the contents of App.vue :
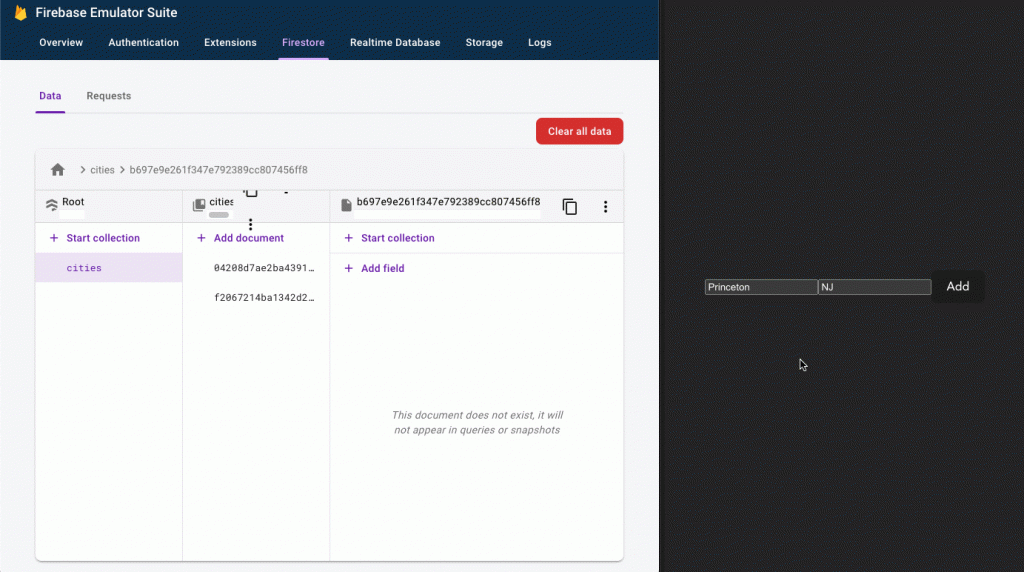
A simple, barebones UI with two inputs and a button
Now we can type in a city name, a state name, and click the button to invoke our API:
🎉
Adding Authentication
Firebase supports a variety of authentication sources including:

Of the SSO federation gateways I’ve used including AWS Cognito and Azure AD B2C, Firebase has the smoothest experience by far.
To get started, we’ll need to add the Firebase package to our front-end:
cd web-vue
yarn add firebase
At this point, we have to initialize the app with the upstream (cloud hosted) runtime. If not, we’ll run into the following error:
No Firebase App '[DEFAULT]' has been created - call Firebase App.initializeApp() (app/no-app).
Log into the Firebase console UI and register an app by clicking Project settings (the cog icon) and find the Your apps section at the bottom. You can name the client app anything you want (doesn’t matter for now) and you’ll get something like the following:
# None of these values are secret; they end up compiled into the
# output package.
const firebaseConfig = {
  apiKey: "AIzaSyBa_VDckwNQ2OaooVRoSJY",
  authDomain: "dn6-firebase-demo.firebaseapp.com",
  projectId: "dn6-firebase-demo",
  storageBucket: "dn6-firebase-demo.appspot.com",
  messagingSenderId: "87796597610",
  appId: "1:87796597610:web:c8d363161b2ead61811b13"
};
Now update the app code and add a button to trigger our firebaseLogin function:
Check out that sweet emulation of the Google Authentication flow:

At this point, we have a JWT token on the front-end that we can send to our backend API via the Authorization header:
On line 9, we use our authToken captured earlier.
Back-End Validation
When we make the API call now, it’ll include the Authorization header and we can now verify the request on the back-end by validating the token.
Start by adding a package for JWT handling:
cd api
dotnet add package Microsoft.AspNetCore.Authentication.JwtBearer
Next we add the [Authorize] attribute on our route handler:
See line 2 where we add the authorization directive.
If we make the API call now after adding the default authentication and authorization middleware, the call will fail with a 401 Unauthorized.
The next step is to configure the middleware for handling JWT token validation into our pipeline.
Pay special attention to the statement on line 12 where we set the RequireSignedTokens to false in development since the token we get from the emulator isn’t signed.
And our API call once again works as expected!
Real-Time Subscriptions
One of the draws of using Firebase with Firestore is the support for real-time subscriptions off of the database. Having used both AWS Amplify (AppSync + DynamoDB) and Firestore, I much prefer Firestore over Amplify.
With Amplify, real-time updates are done by constructing GraphQL queries for subscriptions whereas with Firestore, it’s a simple path-based query with conditionals. I’m not a huge fan of the verbosity of GraphQL so Firestore’s simple approach is welcome!
It should be noted that AppSync still has some gaps with respect to dynamic authorization of subscriptions while Firestore’s path based policies are much easier to reason about and work with, in my opinion. (Not to mention that more advanced scenarios in AppSync require working with Apache Velocity Templating Language).
Let’s see our Firestore subscription in action:
A snippet of our App.vue; we’ll start the subscription on a button click since we need to authenticate first.
Start by adding an interface for City that we’ll use to type our backend data.
Once again (on line 9), we point our client to the emulator (in real code, you’ll want to add a conditional around this line).
Finally, we create our function to start our subscription and update our template:
Boom 🤯:
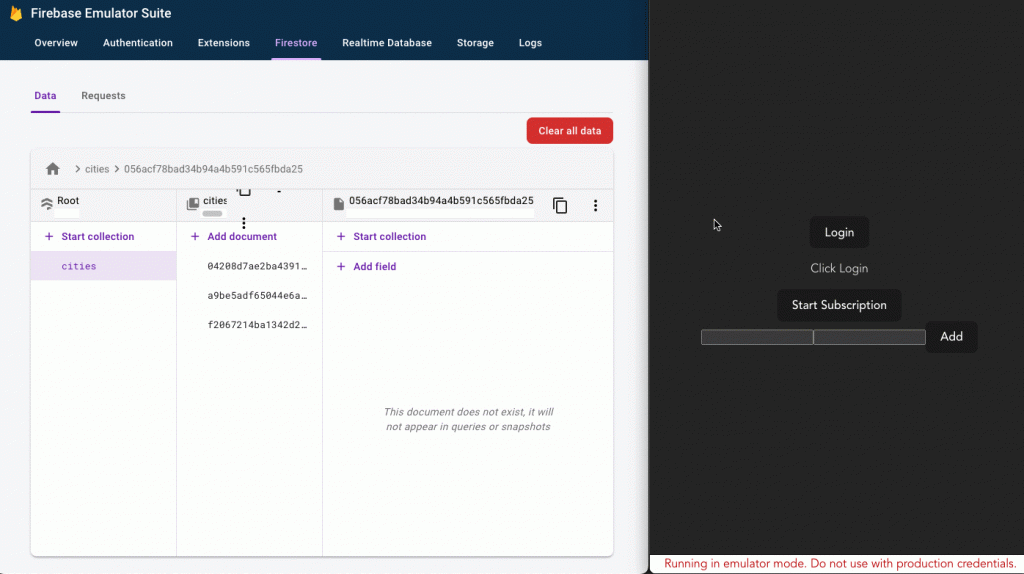
Note that as soon as we connect the subscription, it automatically performs the specified query as well and initializes our view.
Adding a new city on the front-end via an API call to our dotnet 6 web API causes it to appear immediately in the database which pushes an update to our front-end. Likewise, deleting a city on the back-end will instantly reflect in our UI.

Wrap Up
There’s a ton of old documentation and examples on the web with very few real examples of working with the emulator from end-to-end with a front-end and back-end API. In all honesty, the Google docs for Firebase are lacking here as well and in particular provides very poor and incomplete guidance on how to connect to the emulator.
That said, it’s amazing how complete the emulator itself is and how easy to use it is compared to my experience with AWS Amplify; I was not at all expecting the authentication to also work with emulation as well. Very clever way of emulating the full flow, Google.
Meanwhile, I’m still waiting on a CosmosDB emulator that’ll run on M1 🫤 (gimme some love, Microsoft; I really want to use CosmosDB!).
Is Google Firebase the ticket? Having been burned by Amplify once, I’m a bit weary to dive in without some more experimentation. There are some gotchas around operations like batch deletion that one has to be aware of.
In that respect, Supabase is worth a look as it provides a free, proven relational Postgres backend to start with, but some of the documentation there also seems shaky and obviously less mature.
On Azure, I’d need to use SignalR hubs which provide a lot more control over the front-end websocket signaling (same paradigm as Socket.io), but gets costly very quickly and the lack of CosmosDB emulator for M1 is maddening.
What’s also interesting from this experiment is how much cleaner the Vue implementation is compared to the React implementation (maybe someone can tell me what I’m doing wrong!)
TBD for now, but I thoroughly enjoyed seeing this come together and I hope you find it useful!
Tag me on Twitter @chrlschn
The original article published on Medium.
