By Keven Pinto.Oct 20, 2022
In this 2-part Blog, we shall look at how we implemented CICD for Directed Acyclic Graphs (DAGs) on Google Cloud Composer using Google Cloud Build as our CICD platform.
- In Part 1 (this part), we set the basic building blocks in place to allow us to do a multi project CICD build. We end this part with a successful deployment of our DAG in dev
- In Part 2, we will move our DAG from dev to test and then to prod using a Cloud Build Pipeline
CICD
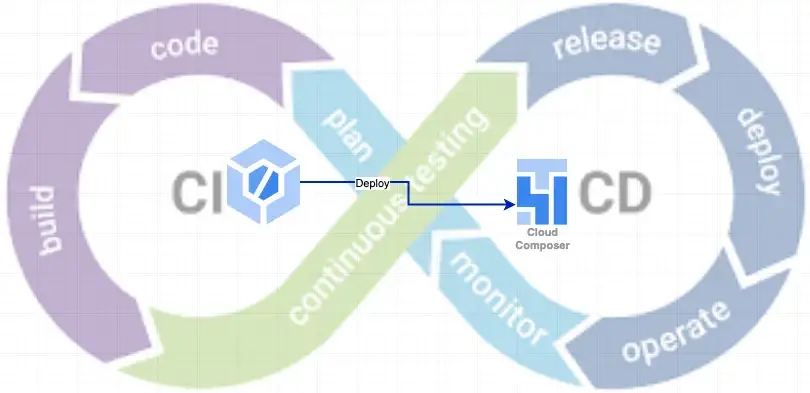
CICD is a critical building block in promoting a GitOps culture within an Organisation/team. DAGs tracked by a Git repository and coupled with consistent processes and tooling; ensures that engineers focus on the design and development of the DAGs rather than delivering these changes across environments. Before we dive into CICD implementation, let’s take a look at some popular CICD patterns.
Pattern 1
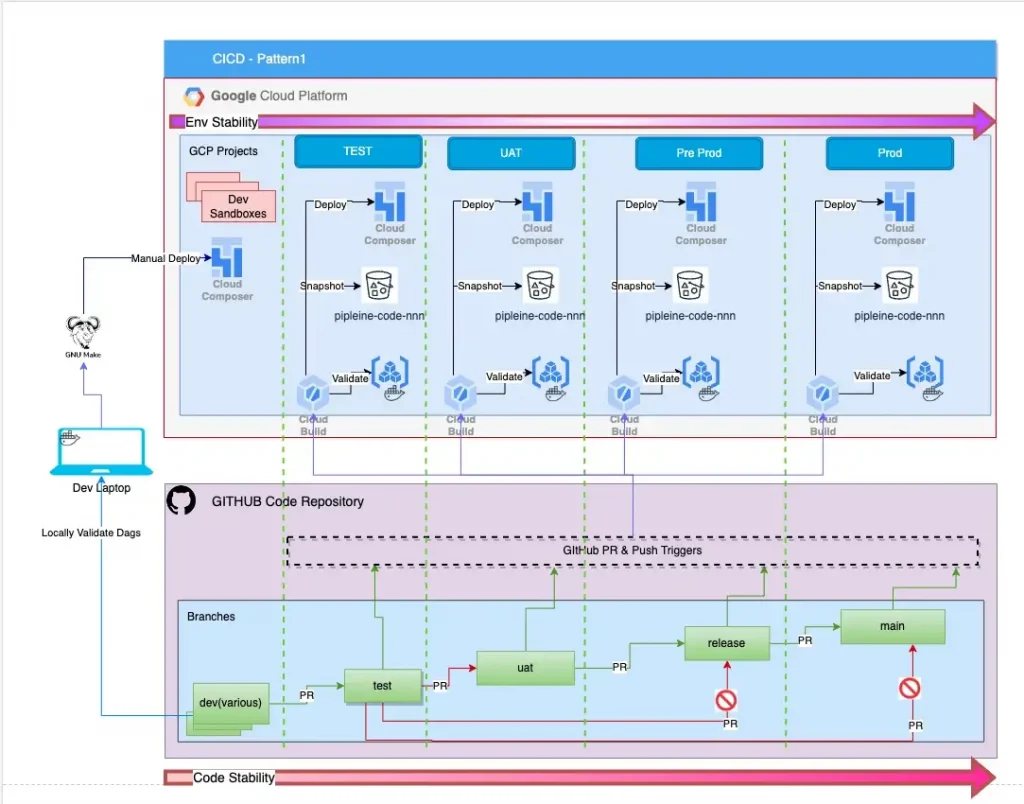
A very common Pattern to CICD is as shown in the Diagram below, in this pattern each Google Cloud Project has a dedicated Cloud Build service. Each of these Cloud Build services in turn independently track changes to a git based repo and trigger one or more CICD pipelines within their project. This is a widely used pattern as each cloud build service manages a single dedicated project and failures to a Cloud Build service within a project do not impact any other environments.
Pattern 2
Pattern2 (diagram below) is a centralised approach to CICD. In this Pattern, a dedicated project is created for the sole purpose of validating and distributing changes across all the other environments in the estate. This project runs the minimum number of cloud services necessary to support validation and deployment of build artefacts. This pattern usually divides opinion, so in order to be neutral, let’s state some pros and cons of this approach.
The biggest con to this approach is that this deployment project is a Single Point of Failure to the CICD pipeline.
If u can look beyond this con, read on. We will be walking you through the implementation of this pattern… Sorry!, should have said that earlier.
Some of the benefits of this approach are:
- Centrally located Cloud Build Logs without any need for additional effort/configuration.
- Consolidation of Cloud Services to support validation and distribution of Artefacts, for example, Artefact Registry
- Each new Repo needs to be Authenticated with only a Single Cloud Project via Cloud Build GitHub App
- New Cloud Projects(e.g. Research/PoC) can be added or removed without the need to setup Cloud Build and Individual pipelines in them. A new deployment endpoint can be managed via config.
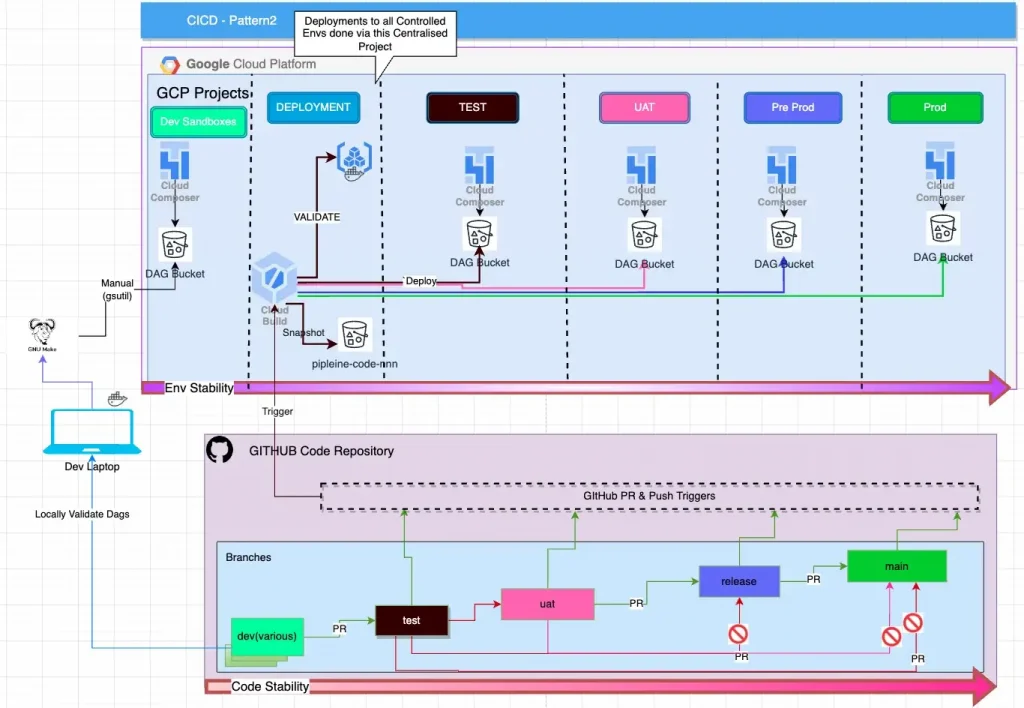
Now that we have introduced the two patterns, we’d like to demonstrate how we went about implementing Pattern2.
Resource Hierarchy
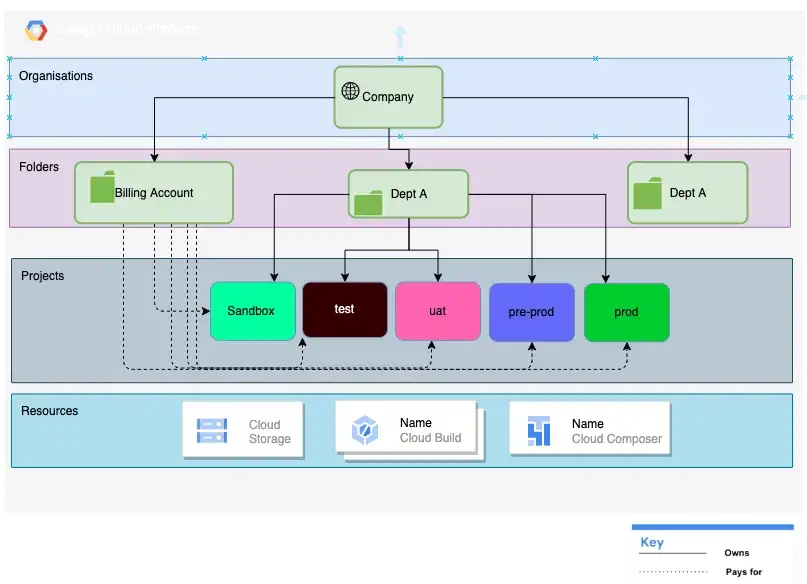
All Google Cloud resources are organised hierarchically. An Organisation Resource is at the Top of this hierarchy, this is followed by Folder resources which are an additional, optional grouping mechanism between organisation resources and project resources, finally, a Billing Account is a cloud-level resource that defines who picks the tab for the cloud resources.
The reason we are talking about these resources is because our opinionated implementation is strictly based on this hierarchy. So if you want to follow along with this tutorial, please ensure you have the following two pieces of information:
- Folder Id
- Billing Account Id
Note: Free Tier users may not be able to follow along as they only have access to Project Resources.
Security
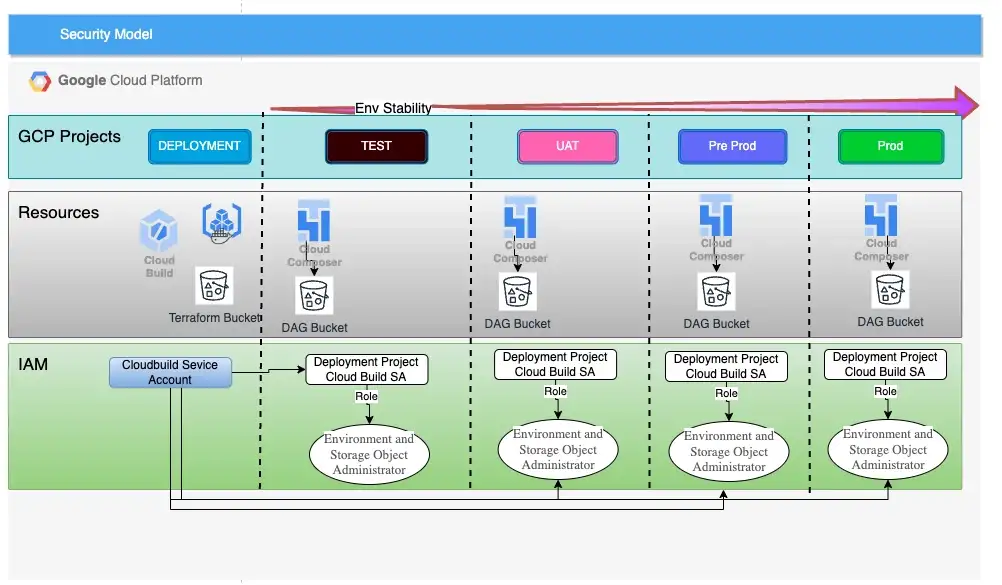
As our Cloud build only runs in the Deployment Project, it needs access to the DAG buckets in the managed environments (test -> prod). This is achieved by registering the Cloud Build service account of the deployment project as a Member in the other google projects.
When registering our Cloud Build SA in our other projects, we need to give it the following roles:
- roles/composer.environmentAndStorageObjectAdmin
- roles/composer.worker
For this tutorial, we don’t need to worry about this setup as it is automatically done for us by our terraform module.
For clarity, a managed environment is any Composer Environment managed by a CICD service — Google Cloud build in this instance. For the purposes of this worked example, test and prod are our managed environments.
Note: If you already have projects in place and are using a custom service account for Cloud Build, register the custom service account in your managed environments. You may need to either modify the Terraform code provided in this repo or do this manually.
Prerequisites
- Fork the code from here in your own Github Account and clone the code on your machine, make all subsequent changes in your forked repo only.
Ensure that you have the following setup on the machine that you will be executing the code:
- gcloud installed and authorised to your GCP Project
- gsutil
- make build tool
- Docker Desktop or equivalent container service like Rancher Desktop
- git
- Google user with rights to create Google projects under a specific folder and attach these projects to Billing Accounts
The sample code will setup the following 4 GCP Projects for you under a specified folder:
- deployment
- dev
- test
- prod
The dev project has been added for completeness but will not benefit from a Cloud Build setup, this service is only for our managed environments i.e test and prod.
We then setup build triggers within the Cloud Build service in our newly created deployment project. These triggers track changes to our repo and deploy our DAGs to the appropriate environments.
Why is dev not managed by Cloud Build, you ask ?
- Need to deploy code without committing it to a branch (PoC/Learning Mode)
- Faster feedback as opposed to a CICD build that could take 3–5 minutes
- Learning Mode where one needs to check out a new feature of Airflow without the need for a full blown CICD pipeline.
Later in this article, we do cover our dev deployment process via our Makefile, this method although manual, still enforces a small amount of rigour, you will find out more on this process once we reach that section.
Project Layout
.
├── Makefile
├── Readme.md
├── cloudbuild
│   ├── Dockerfile
│   ├── on-merge.yaml
│   ├── pre-merge.yaml
│   ├── requirements.txt
│   └── run_integration_tests.sh
├── config
│   ├── env.config
│   ├── env_mapper.txt
│   ├── projects.yaml
│   └── repoconfig.yaml
├── dags
│   ├── __pycache__
│   │   ├── airflow_monitoring.cpython-39.pyc
│   │   └── good_dag_v1.cpython-39.pyc
│   ├── airflow_monitoring.py
│   ├── good_dag_v1.py
│   ├── scripts
│   ├── sql
│   └── utils
│       ├── __init__.py
│       ├── __pycache__
│       │   ├── __init__.cpython-39.pyc
│       │   └── cleanup.cpython-39.pyc
│       └── cleanup.py
├── info.txt
├── infra
│   ├── env_subst.sh
│   ├── modules
│   │   └── projects
│   │       ├── main.tf
│   │       └── variables.tf
│   ├── proj_subst.sh
│   ├── projects
│   │   ├── backend.tf
│   │   ├── main.tf
│   │   ├── provider.tf
│   │   ├── terraform.tfvars
│   │   └── variables.tf
│   ├── tf_utils.sh
│   └── triggers
│       ├── backend.tf
│       ├── main.tf
│       └── provider.tf
└── tests
    ├── __pycache__
    │   └── test_dags.cpython-39-pytest-7.1.2.pyc
    └── test_dags.py
- Makefile : This file contains all the targets to automate build, test and run various tasks in this Tutorial. this file is our friend!
- cloudbuild : This directory contains all our google cloud build files
- config : This directory contain config files that will need to be changed as per the readers environment
- dags : This directory contain our DAGs, this is what gets deployed to Cloud Composer
- infra : Terraform code to create projects, composer and cloud build triggers
- tests : Our DAG integrity testing code lives here
Modify the Sample Code
Start of first by creating a branch called cicd in your repo.
git checkout -b cicd
and then set the push to the correct upstream branch
git push --set-upstream origin cicd
Please make all changes in this branch, this branch will also be used to create a PR in later steps.
Next, run make init , After running this step, you will notice a docker image called cicd being deployed to your machine, we will use this for airflow DAG integrity testing(?!) at a later stage and for our terraform deployments.

Next, go to the config folder of the repo and modify file env.config to your own specific values, do not change the variable names, just the values please.
As mentioned before, we will be creating 4 new projects, so we need the names of these projects specified in here, in addition we also need the folder ID under which these projects need to be created and the billing account that these services will be billed to.
TF_VAR_folder=<CHANGEME>, example 99999999999
TF_VAR_billing_account=<CHANGEME>, example XXXXXX-XXXXXX-XXXXXX
TF_VAR_location=<CHANGEME>, example, europe-west2
TF_VAR_deployment_project=<CHANGEME>, example, cicd-arequipa-deploy-917f1x
TF_VAR_dev_project=<CHANGEME>, example, kevs-dev-project-917f1x
TF_VAR_test_project=<CHANGEME>, example, kevs-test-project-917f1x
TF_VAR_prod_project=<CHANGEME>, example, kevs-prod-project-917f1x
Note, Project Ids need to be unique and in lower case, be sure to add a short UUID as shown in bold in code snippet above to make sure you don’t hit an error.
While in this folder, please modify the file repoconfig.yaml change the name of the owner to your own github user. there are 2 instances of this entry in the file, make sure to change both.
github:
  owner: kev-pinto-cts --> Change this
Setup the deployment Project
Pattern 2 requires a a dedicated deployment project, so that’s what we are going to do. Please go to the root folder of the repo and type the command make bootstrap . This will create a project with the name you have supplied in the config/env.config file. ensure this project exists before proceeding any further.
Note, You will be prompted by Google Cloud to select the correct account for Authorisation in the Cloud, Please select the correct account and then click Allow on the next Screen.
Setup Artifact Registry in the deployment Project
Type the command make repo in the root folder of the repo. This should create a docker repo called airflow-test-container in the deployment project.
We will be unit testing our DAGs as part of our pre-merge process. In order to do the same we need a container with the Airflow Library installed. This container will reside in this new repo we have just created.
Setup the dev, test and prod Projects
Type the command make projects in the root folder of the repo. This will do the following:
- Create the dev, test and prod projects using the names provided in the
configenv.configfile - Enable the required set of APIs in these projects
- Register the Deployment Projects Cloud Build SA as a principal in each of these projects with the cloud composer Role (Environment and Storage Object Administrator & Composer Worker).
Install Cloud Composer
Type the command make composer in the root folder of the repo. This will do the following:
- Install Google Cloud Composer in each of the Projects created above, the name of the Composer env will be the same as the project.
- Generate a text file (config/env_mapper.txt) that needs to be modified in the next step.
This step will take a while (50 mins) so i suggest catching up on all pending work/try origami/walk the dog… anything but stare at the Terraform progress bar.
Once terraform completes, please check for all of the steps and artefacts mentioned above proceeding.
Note: Cloud Composer 2 is not set up in all Regions yet, so if you get Terraform Timeouts, That could be the likely cause, please check here region support.
Branch to Env Mapping
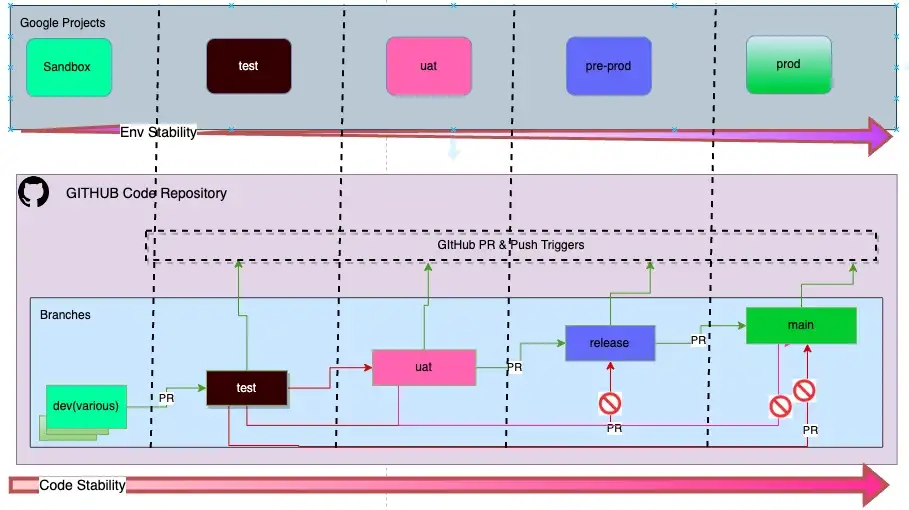
The diagram below shows that we have mandated a Branch to Env mapping. This means that a Composer Env will receive code from a particular git branch only. As part of our SDLC document we have also mandated the order in which code is promoted from one branch to another. This prescribed path ensures that by the time the code reaches the main branch, it has been tested across the other env’s and has a higher level of stability (he hopes).
So where is the Branch to Env mapping config Stored?
In the last step we stated that terraform will generate a text file called config/env_mapper.txt. it’s now time to edit it.
kevs-dev-project~gs://europe-west2-kevs-dev-project-07de6/dags
kevs-test-project~gs://europe-west2-kevs-test-project--07de67c8-bucket/dags
kevs-prod-project~gs://europe-west2-kevs-prod-project--29e6ee85-bucket/dags
This file contains a mapping of the composer env to its corresponding DAG storage bucket separated by a ~. It is here that we need to add our branch mapping. We will also be removing our dev env entry as we don’t need this to be done via cloud build. below is what your file should look like after modifying it. The project and bucket names will be the different, of course !
kevs-test-project-917f1x~gs://europe-west2-kevs-test-project--07de67c8-bucket/dags~test
kevs-prod-project-917f1x~gs://europe-west2-kevs-prod-project--29e6ee85-bucket/dags~main
The mapping above states that the test project will map to the test branch and prod will map to main. Please create a branch called testfrom the Github console/CLI based on main as we will need this later.
Although, the diagram shows a 1–1 mapping between a Google project and a git branch, there is no reason why a 1-n cannot be supported, just add more projects to the same branch, one per line. like shown below.
This is what we meant, when we said, “New Cloud Projects(Research/PoC) can be added or removed…via config”
kevs-test-project-917f1x~gs://europe-west2-kevs-test-project--07de67c8-bucket/dags~test
kevs-new-project-917f1x~gs://europe-west2-kevs-test-project--07de67c8-bucket/dags~test
kevs-prod-project-917f1x~gs://europe-west2-kevs-prod-project--29e6ee85-bucket/dags~main
Connect the Repo to the Deployment Project
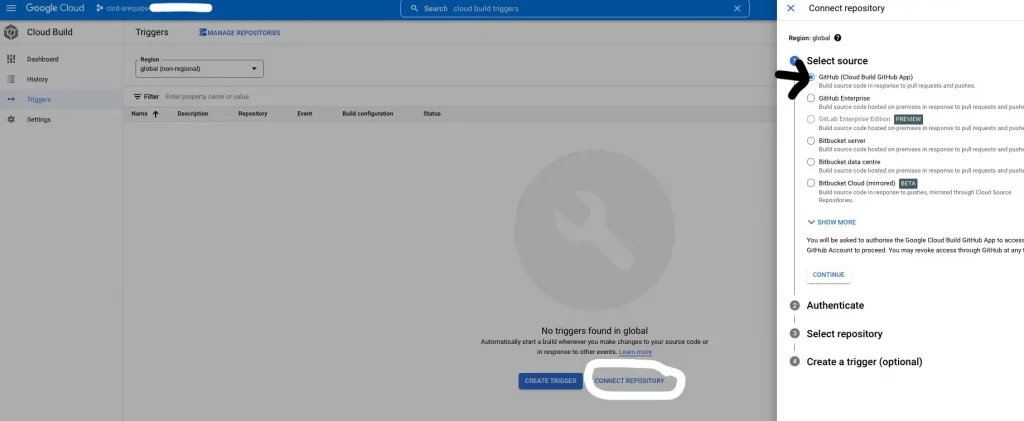
Log in to the Google cloud console and follow these steps to connect to your repository. Please ensure sure that you establish this connection while you are in the Deployment Project.
Do not create any triggers from the console, we will do the same via Terraform in the next step.
Setup the Triggers
Assuming that you have already modified the file config/repoconfig.yaml , please type the command make triggers in the root folder of the repo. You should now see 2 triggers in the Google Console as shown below. You will find this screen in your deployment project under Cloud Build->Triggers.

Why do we have 2 CICD triggers?
We may choose to Cancel a Pull Request after Raising a PR, in this case, the DAGs must not be deployed. so to deal with these scenarios we have 2 triggers:
- Pre-Merge trigger → This CICD pipeline executes on a Pull Request and runs checks for coding standards, security, DAG integrity and integration tests
- On-Merge Trigger → This CICD pipeline executes when the PR Reviewer decides to merge the request, this pipeline is responsible for the actual deployment of the DAGs to Cloud Composer.
CICD in action (dev first)
Let’s start by validating and deploying our code to our dev environment first. we have a single DAG in our repo called good_dag_v1.py. Although this isn’t CICD via Cloud Build in action, this is still a crucial step of our the SDLC process.
Below is our DAG code, it’s a syntactically correct DAG, however, where’s the fun in that! …. so, let’s modify this DAG to inject an error, let’s introduce a cyclic error, this is achieved by adding the lines highlighted in bold below.
Type the command make deploy in the root folder of the repo and observe the results…..
from pathlib import Path

# Third Party Imports
from airflow.decorators import dag
from airflow.utils.dates import days_ago
from airflow.operators.empty import EmptyOperator
from airflow.operators.bash import BashOperator

default_args = {
    'start_date': days_ago(1),
    'catchup': False,
    'max_active_runs': 1,
    'tags': ["BAU"],
    'retries': 0
}


@dag(dag_id=Path(__file__).stem,
     schedule_interval="@once",
     description="DAG CICD Demo",
     default_args=default_args)
def dag_main():
    start = EmptyOperator(task_id='start')

    print_var = BashOperator(task_id='print_var',
                             bash_command='echo "Hello"')

    end = EmptyOperator(task_id="end")

    start >> print_var >> end >> start


# Invoke DAG
dag = dag_main()
As we can see from an excerpt of the error message below, the DAG failed an integrity test due to a cyclic check fail and as a result the deployment to the Dev env was abandoned. So although we deploy manually to dev, we still ensure that we maintain some form of quality control by ensuring we run the DAG thru a generic test case.
======================================================================================================= short test summary info ========================================================================================================
FAILED tests/test_dags.py::test_dag_integrity[/workspace_stg/tests/../dags/good_dag_v1.py] - airflow.exceptions.AirflowDagCycleException: Cycle detected in DAG. Faulty task: end
================================================================================================ 1 failed, 1 passed, 1 warning in 0.26s ================================================================================================
So what caused this error to be highlighted?
… a bit of a diversion but this topic is worth a visit.
The make deploytarget called a generic DAG Integrity Test Case (via pytest). This test case checks our DAGs for many common errors such as:
- imports
- cyclic checks
- common syntax errors
I first came across DAG integrity tests in this excellent blog(See Circle 1) written by the engineers at ING . I have since modified the code very slightly to work with Airflow 2. The code basically looks at the /dag folder for DAGs and among other things, uses the Airflow Library routine check_cycle to catch any cyclic checks. The code runs within the container that we setup as part of our bootstrap process and makes use of the Airflow Library version 2.3.3 (configurable from within the Dockerfile).
Note: Please run make init in case you decide to change the AIRFLOW_VERSION to a different version to that specified in the Dockerfile to rebuild the container.
One can also run the target make tests to run this test explicitly and see the outputs. I’d encourage you to take a look at this code. it is pretty self explanatory and sits in the repo under tests/tests.dag.
Now, please remove the injected error in the DAG and run make deploy once more
===================================================================================================== 2 passed, 1 warning in 0.22s =====================================================================================================
Building synchronization state...
If you experience problems with multiprocessing on MacOS, they might be related to https://bugs.python.org/issue33725. You can disable multiprocessing by editing your .boto config or by adding the following flag to your command: `-o "GSUtil:parallel_process_count=1"`. Note that multithreading is still available even if you disable multiprocessing.
Starting synchronization...
If you experience problems with multiprocessing on MacOS, they might be related to https://bugs.python.org/issue33725. You can disable multiprocessing by editing your .boto config or by adding the following flag to your command: `-o "GSUtil:parallel_process_count=1"`. Note that multithreading is still available even if you disable multiprocessing.
Copying file://dags/__pycache__/airflow_monitoring.cpython-39.pyc [Content-Type=application/x-python-code]...
Copying file://dags/.airflowignore [Content-Type=application/octet-stream]...
Copying file://dags/__pycache__/good_dag_v1.cpython-39.pyc [Content-Type=application/x-python-code]...
Copying file://dags/good_dag_v1.py [Content-Type=text/x-python]...
Copying file://dags/.DS_Store [Content-Type=application/octet-stream]...
Copying file://dags/utils/cleanup.py [Content-Type=text/x-python]...
Copying file://dags/utils/__init__.py [Content-Type=text/x-python]...
Copying file://dags/utils/__pycache__/__init__.cpython-39.pyc [Content-Type=application/x-python-code]...
Copying file://dags/utils/__pycache__/cleanup.cpython-39.pyc [Content-Type=application/x-python-code]...
/ [9/9 files][  9.6 KiB/  9.6 KiB] 100% Done
Operation completed over 9 objects/9.6 KiB.
That’s it for this week, we have successfully deployed a DAG to our dev env. To view this DAG open composer deployed in the Dev Project and view the DAG in the Airflow UI. You should see something resembling the Screenshot below:

Summary
Congrats, we have deployed our DAG to the dev project.
Although we have still not played with Cloud Build and inspected our CICD pipeline, we have setup the following building blocks:
- deployment project
- dev, test and prod projects
- Cloud Composer Environments
- IAM Setup
- Cloud Build triggers
In Part 2, we will move the code from dev to test and then to prod using the Cloud Build CICD pipelines. Thanks for following along and see you soon!.
Not forgetting to state a Big Thanks(!) to
Vitalii Karniushin for helping test and debug the demo code!
About CTS
CTS is the largest dedicated Google Cloud practice in Europe and one of the world’s leading Google Cloud experts, winning 2020 Google Partner of the Year Awards for both Workspace and GCP.
We offer a unique full stack Google Cloud solution for businesses, encompassing cloud migration and infrastructure modernisation. Our data practice focuses on analysis and visualisation, providing industry specific solutions for; Retail, Financial Services, Media and Entertainment.
We’re building talented teams ready to change the world using Google technologies. So if you’re passionate, curious and keen to get stuck in — take a look at our Careers Page and join us for the ride!
Makefile Help

Disclaimer: This is to inform readers that the views, thoughts, and opinions expressed in the text belong solely to the author.
The original article published on Medium.
