By Animesh Rastogi.Jun 23, 2022

Quite recently, a customer of mine suffered a massive security breach where the attacker was able to slip a malicious container image to the customer’s container registry(Google Container Registry in this case) which was then deployed to production in Cloud Run. This happened because of some leaked Service Account Key which the developer had mistakenly checked into a public repository.
Hence, the customer was looking for a way that only images created by their CI/CD pipeline can be deployed to production and all other images are rejected. This is the perfect use case for Binary Authorization in GCP.
Binary Authorization is a deploy-time security control that ensures only trusted container images are deployed on Google Kubernetes Engine (GKE) or Cloud Run.
Binary Authorization achieves this using Attestations. An attestation certifies that a specific image has completed a previous stage, as described previously. You configure the Binary Authorization policy to verify the attestation before allowing the image to be deployed. At deploy time, instead of redoing activities that were completed in earlier stages, Binary Authorization only needs to verify the attestation. Before an image can be deployed, any required signers must create an attestation that verifies that the image is ready to move to the next deployment stage. The attestation is a record that contains the registry path and digest of the image, and that has been digitally signed using the signer’s private cryptographic key.
In this demo, we’re going to use Cloud Build to create a CI/CD pipeline to create a new container image, push it to artifact registry, create a binary authorization attestation and deploy it to Cloud Run.
Pre-requisites
- Containerised Application which adheres to the Container Runtime Contract.
- Private Docker Repository in Artifact Registry
- Git Repository for your code. e.g. Github.
- Cloud Build trigger connected with your repository
Alright, when you’re done with these pre-requisites, follow along to the following steps:
Step 1: Creating an asymmetric key in Cloud KMS.
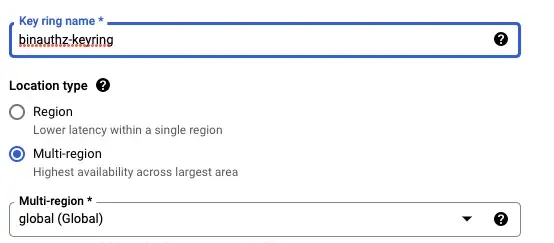
This is the key using which the attestor will sign theimages. Go to Cloud KMS in GCP Console and click on Create Key Ring at the top. Enter the Key Ring name and keep Location Type as Global.

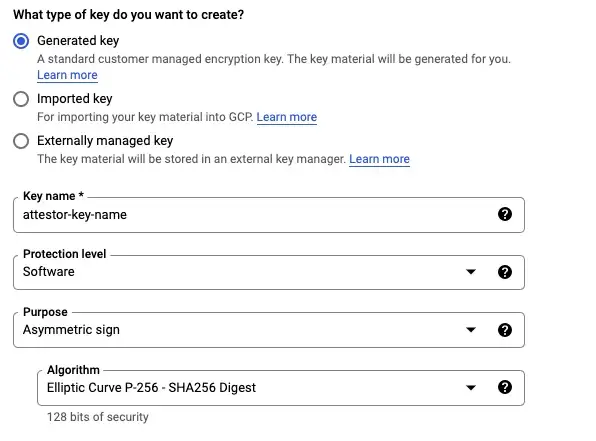
Click on Create Key at the top and enter the details as required. Select an Asymmetric sign with Algorithm as Elliptic Curve P-256 — SHA256 Digest.

Step 2: Go to Binary Authorization section and create an Attestor which uses the key created in the previous step.
Click on Attestors > Create Attestors
- Add Attestor’s name and Description
- Under Public keys for signature verification, select PKIX Keys
- For Public Key Material, select Import from Cloud KMS and enter the resource ID for your recent key version.
- Click Create to create the attestor
Step 3: Create a Binary Authorization Policy to only allow container images attested by the attestor created above to be deployed.
- Go to Policy > Edit Policy
- Select Require Attestations.
- Click on Add Attestors and write the name of your project and attestor and click on Add Attestor
- Ensure Google system image exemption checkbox is checked.
- Click on Save Policy
You have now successfully create a Binary Authorization attestor and a deployment policy. Now, comes the exciting part, writing the build config file.
A build config file contains instructions for Cloud Build to perform tasks based on your specifications. You outline a set of steps that will be run as part of your pipeline. For example, your build config file can contain instructions to build, package, and push Docker images. You can also include automated tests as part of your build process.
For our use-case, I’ve kept the steps very basic.
Build Config file for Cloud Build
The yaml file linked above has 5 broad steps:
- Building the docker image
- Pushing the image built in step 1 to Artifact registry
- Fetching the Image digest and persisting the value in /workspace/image-sha.txt
- Creating an attestation on the image built and pushed to the artifact registry in the previous steps.
- Deploying the image to Cloud Run.
Ensure you have the flag — binary-authorization set when you deploy your service to Cloud Run.
Now, if anyone tries to deploy any new version of the Cloud Run service containing a malicious container image, it will be rejected since it is not a trusted image.
Summary
In this demo, we created a CI/CD pipeline to ensure only images built by our pipeline can be deployed to Cloud Run or GKE using binary authorization. This is crucial for your software supply-chain security to ensure only trusted images meeting your enterprise standards reach production and malicious/vulnerable images are rejected.
We used Cloud Build to write the pipeline here however you can use any tool of your choice like Github Actions, Jenkins, CircleCI, etc and use the same concepts.
Note: When an attempt is made to deploy or serve an image that violates the Binary Authorization policy, Cloud Run displays an error along with a Breakglass button. To bypass Binary Authorization enforcement and deploy or serve a container that violates the policy, use the breakglass option. When you use breakglass to deploy an image, a breakglass event is automatically logged to Cloud Audit Logs, regardless of whether the deployment satisfies or violates the policy. You can use Cloud Audit Logs to view breakglass events and trigger other actions.
References
- Google Cloud / Build configuration file schema
- Google Cloud / Binary Authorization overview
- Google Cloud / Create attestations
- How we’re helping to reshape the software supply chain ecosystem securely
- Google Cloud / Use breakglass (Cloud Run)
The original article published on Medium.
